Realm of The Mad God Guide
Realm of the Mad God is a massively co-op action RPG that drops you into the thick of the fight in a world overwhelmed by monsters. The game features online co-op gameplay in a huge "live world", thousands of enemies, real-time action combat, leveling, loot, equipment and magic.
Realm of the Mad God was owned by Wildshadow Studios (acquired by Kabam in June 2012) and Spry Fox. It was in public beta from January 2010 and the browser version officially launched on June 20, 2011. On February 20, 2012 the game was made available on the digital distribution platform Steam for Windows and Mac.
About the Game
The game starts when you spawn in a tutorial world. In the tutorial you will learn how to equip items, where items are, how to move with WASD and many other things. After your done with the tutorial you wlll spawn in the nexus, a place where all the players are safe and have time to chat to each other. If you go deeper down the Nexus you will find portals named Medusa, Cyclops, and Djinn for example. If you enter a portal you will spawn in a world with over 1,000 of monsters, and its up to you to beat them. If you go deeper through the realm you will find harder monsters and eventually you will reach Godlands, the place of God.
This is a Perma-death game, which basically means when you die you lose everything you had on you and your character starts again from scratch. The only exception is your pet which lives in the pet yard and always finds its way back there when your character dies.
.
Characters

Wizard
Deals damage from a long distance and has a secondary burst attack.
Deals damage from a long distance and has a secondary burst attack.

Priest
Unlocked by reaching level 5 with Wizard. Attacks at long range and can heal himself and his allies.
Unlocked by reaching level 5 with Wizard. Attacks at long range and can heal himself and his allies.

Necromancer
Unlocked by reaching level 20 with Wizard and Priest. Drains life from his enemies to heal himself and his allies.
Unlocked by reaching level 20 with Wizard and Priest. Drains life from his enemies to heal himself and his allies.

Mystic
Unlocked by reaching level 20 with Huntress and Necromancer. Fights with a staff and uses her crystal ball to bind enemies to a distant plane.
Unlocked by reaching level 20 with Huntress and Necromancer. Fights with a staff and uses her crystal ball to bind enemies to a distant plane.

Sorcerer
Unlocked by reaching level 20 with Necromancer and Assassin. Uses his scepter to fire blasts of chain lightning at his enemies
Unlocked by reaching level 20 with Necromancer and Assassin. Uses his scepter to fire blasts of chain lightning at his enemies

Archer
Unlocked by reaching level 5 with Priest. Has a long-range attack and can acquire very powerful weapons. His Ability is his quiver, which fires a very powerful, piercing, single arrow.
Unlocked by reaching level 5 with Priest. Has a long-range attack and can acquire very powerful weapons. His Ability is his quiver, which fires a very powerful, piercing, single arrow.

Huntress
Unlocked by reaching level 20 with Rogue and Archer. Uses arrows and traps to defeat her enemies.
Unlocked by reaching level 20 with Rogue and Archer. Uses arrows and traps to defeat her enemies.

Rogue
Unlocked by reaching level 5 with Archer. Relies on his speed to deal damage at medium range while avoiding attacks. His Ability is a Cloak which allows him to go undetected by enemies for a time.
Unlocked by reaching level 5 with Archer. Relies on his speed to deal damage at medium range while avoiding attacks. His Ability is a Cloak which allows him to go undetected by enemies for a time.

Assassin
Unlocked by reaching level 20 with Rogue and Wizard. Fights from medium range and uses poison to damage his enemies over time.
Unlocked by reaching level 20 with Rogue and Wizard. Fights from medium range and uses poison to damage his enemies over time.

Trickster
Unlocked by reaching level 20 with Assassin and Paladin. Fights with a dagger while using her magical prism to distract enemies.
Unlocked by reaching level 20 with Assassin and Paladin. Fights with a dagger while using her magical prism to distract enemies.

Warrior
Unlocked by reaching level 5 with Rogue. Deals the most damage of any class and can wear strong armor to protect himself from enemies. His Ability grants extra strength and speed to those around him for a short time.
Unlocked by reaching level 5 with Rogue. Deals the most damage of any class and can wear strong armor to protect himself from enemies. His Ability grants extra strength and speed to those around him for a short time.

Knight
Unlocked by reaching level 20 with Warrior. Deals large amounts of damage at close range and has the highest potential defense of any character. His Ability provides extra defense in addition to damaging and stunning enemies.
Unlocked by reaching level 20 with Warrior. Deals large amounts of damage at close range and has the highest potential defense of any character. His Ability provides extra defense in addition to damaging and stunning enemies.

Paladin
Unlocked by reaching level 20 with Priest and Knight. Can deal damage at close range, wear armor and heal himself and his allies.
Unlocked by reaching level 20 with Priest and Knight. Can deal damage at close range, wear armor and heal himself and his allies.

How to Play
After you choose your class, you'll be put in a tutorial. Follow the instructions on screen and you'll quickly get a feel for the game. The basics:
- Use W, A, S, and D to move and the mouse to aim and attack.
- Press the Spacebar to use your Ability.
- Obtain items by standing on a loot bag and dragging goods from them to your inventory. Or double click on an item to obtain or use the item.
- Health is the red bar at the top right. If you die, you will have to start back at level 1.
- Above health is your experience. Level up and your heath and mana meters are fully replenished.
- Mana is the blue meter and is drained with each use of your Ability.
- To chat, press enter and type a message, then press enter again to send it. If you ever need help, trying asking those around you.
- Press T to toggle autofire.
- Press N, M, or B to toggle music, sounds, or bullet sounds respectively.
- Press H to display a list of controls.
- Press R to escape to the Nexus
Basics
Team Up
Realm of the Mad God is a game best played with others. Just standing near people who are slaying beasts will earn you experience and help you level up.
In Realm of the Mad God, harder bosses can only be taken on with lots of people. Fighting in a crew lets you distribute the inflicted damage, flank your enemies, and lay down some serious fire power with the various classes. When fighting easier enemies, you'll see large groups more dispersed, ploughing through enemies. But when a group of warriors encounters an army of gods, you'll see them all tightly clumped up in a phalanx around the healing Priests and Paladins. I recommend doing the same.
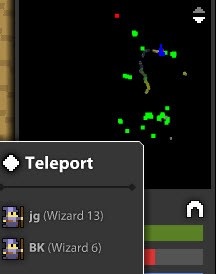
Pro Tip: Once you get a feel for the game, teleport to the largest clump of players on your mini map. They are most likely fighting very hard enemies, so just hang back and let them slay the gods, earning you tons of experience super quickly.
Realm of the Mad God gives us a number of ways to work cooperatively. The most significant feature is teleporting. Using your mini-map, you can teleport to anyone, anywhere on the map. However, teleporting in Realm of the Mad God is both dangerous and useful. It's useful when you're about to die and need a quick way to escape. But it can be dangerous because you have no idea where you'll end up. I've died countless times teleporting into the cross fire of a massive battle. Also, by shift clicking people at the bottom left, you can lock them there, allowing you to easily teleport to your friends without using the mini map.
Pro Tip: In Realm of the Mad God, chat is global. This means that messages are sent to everyone on the server at once, which can often by quite annoying. By typing /ignore followed by the player's name, you can block all messages from a person for the duration of your stay on the server. This is great for dealing with trolls and foreigners.
Realm of the Mad God is a game best played with others. Just standing near people who are slaying beasts will earn you experience and help you level up.
In Realm of the Mad God, harder bosses can only be taken on with lots of people. Fighting in a crew lets you distribute the inflicted damage, flank your enemies, and lay down some serious fire power with the various classes. When fighting easier enemies, you'll see large groups more dispersed, ploughing through enemies. But when a group of warriors encounters an army of gods, you'll see them all tightly clumped up in a phalanx around the healing Priests and Paladins. I recommend doing the same.
Pro Tip: Once you get a feel for the game, teleport to the largest clump of players on your mini map. They are most likely fighting very hard enemies, so just hang back and let them slay the gods, earning you tons of experience super quickly.
Realm of the Mad God gives us a number of ways to work cooperatively. The most significant feature is teleporting. Using your mini-map, you can teleport to anyone, anywhere on the map. However, teleporting in Realm of the Mad God is both dangerous and useful. It's useful when you're about to die and need a quick way to escape. But it can be dangerous because you have no idea where you'll end up. I've died countless times teleporting into the cross fire of a massive battle. Also, by shift clicking people at the bottom left, you can lock them there, allowing you to easily teleport to your friends without using the mini map.
Pro Tip: In Realm of the Mad God, chat is global. This means that messages are sent to everyone on the server at once, which can often by quite annoying. By typing /ignore followed by the player's name, you can block all messages from a person for the duration of your stay on the server. This is great for dealing with trolls and foreigners.

Enemies and Bosses
In Realm of the Mad God, different enemies spawn based on the terrain you're in. At level one you're still very vulnerable so it's a good idea to stick to the beaches or forests where easier enemies appear. If you're in search of a challenge, harder gods and enemies will appear in the snowy and rocky terrains. Following roads will usually keep you among enemies of a similar difficulty.
In Realm of the Mad God, different enemies spawn based on the terrain you're in. At level one you're still very vulnerable so it's a good idea to stick to the beaches or forests where easier enemies appear. If you're in search of a challenge, harder gods and enemies will appear in the snowy and rocky terrains. Following roads will usually keep you among enemies of a similar difficulty.


In addition to regular enemies, there are various bosses and gods around the Realm of the Mad God. These will often be marked on your mini map with a red, pink, orange, or purple dot. On your screen, an arrow will point to them; moving your cursor over the arrow will tell you what god you're headed for.
Pro Tip: If you become overwhelmed in battle, use the panic button. Pressing R will instantly teleport you back to the Nexus. You can also click the white arch under the mini map to instantly return to the safety of the main lobby. Another option is simply quitting out of your browser.

Caves and Dungeons
While exploring the Realm of the Mad God you might find Pirate Caves, Spider Dens, Snake Pits, and more. If you have a key, simply shift click on it and a cave will open up where you're standing. The caves can be pretty long and full of tough enemies, so for the harder dungeons you're going to want a crew with at least one healer in it. Don't feel pressured to finish a dungeon either. If you know you're going to die, head back out the way you came, close your browser or just teleport back to the main lobby.
While exploring the Realm of the Mad God you might find Pirate Caves, Spider Dens, Snake Pits, and more. If you have a key, simply shift click on it and a cave will open up where you're standing. The caves can be pretty long and full of tough enemies, so for the harder dungeons you're going to want a crew with at least one healer in it. Don't feel pressured to finish a dungeon either. If you know you're going to die, head back out the way you came, close your browser or just teleport back to the main lobby.
Character Stats Explained
Health and Mana Points
HP (Hit Points) Your health. When it reaches -1, you die.
When you get hit by a bullet that does the same amount of damage as you have HP, your health will stay at 0. You will live, but you should drink a health potion fast, as ANY enemy can kill you. Don't nexus, because that will kill your character.
MP (Magic/Mana Points) Your magic. This is expended to use abilities. Usage depends on what class and ability item tier you are using.
ATT Boosts
ATT (Attack) Increases the amount of damage done by weapons. Attack does not affect ability damage. Damage Multiplier = 0.5 + (ATT / 50)
Therefore, Total Damage= Base Damage * (0.5 + ATT / 50)
Starting with a base of 50%, each point increases 2%, examples: 10 ATT Priest with a Fire Wand (20-40 DMG) = 14-28 DMG 83 ATT Warrior with a Sword of Acclaim (220-275 DMG) = 475-594 DMG
DEF Boosts
DEF (Defense) Decreases the amount of damage taken.
Straight 1 point per 1 damage reduction, but caps at 85% of total damage, example: 60 DMG Attack against 20 DEF = 40 DMG 60 DMG Attack against 51 or higher DEF = 9 DMG
SPD Boosts
SPD (Speed) Increases the speed at which the character moves. actual speed in TPS (tiles per second) = 4 + 5.6 * (SPD / 75)
DEX Boosts
DEX (Dexterity) Increases the speed at which the character attacks. APS (attacks per second) = 1.5 + 6.5 * (DEX / 75)
VIT Boosts
VIT (Vitality) Increases the speed at which hit points are recovered. Base (0) is 1.0 HP per second, then each point adds about 0.12 HP per second.
WIS Points
WIS (Wisdom) Increases the speed at which magic points are recovered. Base (0) is 0.5 MP per second, then each point adds about 0.06 MP per second.
Equipment
There is a ton of different items and loot in Realm of the Mad God. In addition to rings, potions and keys; there are class specific items that include swords, staffs, robes, and much more. These items are most often dropped by enemies as loot. The harder the enemy, the more powerful the loot. The Items you will find range from Tiers and do not need a certain level requirement. The Tiers range from T0 to T12. The potions range from regular Health and MP and Special Perma Boost Stats Potions. Ex: STR, DEX, SPD, DEF, and LIFE.
T0: Basic starter items. When you create a new account, these items will be in your inventory.
T1: You can find them from killing regular monsters.
T2: You can find them from killing Mini-Bosses or Rare Regular-Monsters
T3: Usually found in Dungeons, like Pirate Cave Portal, or Forest Maze Portal.
T4: You can find them in Level "2" Difficulty Dungeons.
T5: Usually found in Purple Bags, You can find them by killing Drake or Ent Ancient.
T6: Find them in the Godlands. Usually the Mini-Bosses.
T7: Found in the Godlands, usually in the Graveyard Dungeon
T8: Also found in the Godlands, where the Rare Drops in the Graveyard Dungeon are.
T9-T12: You can find Tier 9 to 12 in Godlands where all the Dungeons are. Some include Dexter's Lab, Chaos Dungeon, and for T12 Drops,
you can usually find them in Oryx's Castle.
UT: You can find them in the Godlands, or by using the Realm Key that leads to the Coral Reef Dungeon, or The Davy Jones locker.
Pro Tip: Once having reached level 20, many players will want to start a new character, so they give away their valuable equipment. Very often they will drop their stuff in the main lobby, so always be alert for freebies!

Tips and Secrets
For Newbies
What you want to do is stay by the beaches, there will be an indicator showing a picture of an enemy go towards it, there will be harder quests as you level up more.
For Experienced
You guys probably already know this but, get to level twenty you must have good equipment in order to do this. There is something that I call The God lands, that is a place where harder enemies will be, like the Sprite God, Medusa, Flying Brain, Ghost God, Cyclops God, Leviathan, etc
Secrets
When fighting an Ent Ancient you only have to hit it once and it grows on its own.
To go to Oryx's castle the whole realm has to have a total of 15,000 kills.
Their is an Easter Egg, This requires you to have an UT Tier cloak, that lets you teleport outside the spawn area. You will see a statue of Oryx, this represents their 1 year anniversary for launching ROTMG.
Leveling Guide
- Level 1 - Take your time, stay around the beach area, until you are level 3. Takes about 2 - 5 minutes.
- check all bags on the ground, pick up any HP or MP pots.
- if you find any equipment better than what you are wearing then equip it and drop the other stuff on the ground.
- repeat this for all levels until you are level 20
- Level 3 to level 7 - Go out into the world but if it gets hard retrace your steps and get closer to the beach area where it is easier.
- If you see other low level characters wandering around trying to level up, join with them. Two or more low level people are safer than one at this point.
- Once you are away from beach look for the sandy desert area, you may be lucky enough to come upon a swarm of Sandsman Archers and his friends. Killing these large swarms will level you up very quickly.
- If you decide to ignore my advice and go to Godlands at these levels be aware that a God can one hit you and your dead.
- Level 7 to 15 - You will gain experience faster if you move towards the middle but stay out of Godlands unless you been there before and know what to expect.
- If you are an experienced player or someone that likes to take risks for the big rewards it is pointless to go to Godlands before level 7. This is because at all levels 15 and below the experience you get from killing or killed Gods is kept low by the RotMG game.
- As you increase in levels the experience points you gain for killing the same type of God increases until you reach Level 16 where it levels off.
- When you reach level 7 the experience you are receiving from killing Gods now is great enough to help you level faster.
- Level 15 to 20 - You may be ready for Godlands. Try it out but be careful and always monitor your health. As a guide if my health
- gets to 30% of its max, I jump to Nexus.
- Leveling using the Fame Train
If you are a careful you can level up at one of the Fame Farming Servers. More often the European servers have active fame farming trains. These are easily identified once you are in the realm by a huge amount of people all together traveling in the same direction wiping out everything in their path. Once you find one get into the middle and then start watching to make sure you don't take too many hits from the Gods. Specially dangerous are the Blood Bombs that the Medusa's throw. I have seen 2 or 3 Medusa's hit a fame train and the whole area was littered with tombstones after. If you are careful you can level up really fast here just by following along. It helps to have a healing pet to keep you healthy.
Note: There are no designated Fame Farming servers, but there are servers where the is a good chance that many people are fame farming.
Types of Bags
Loot Bag Types and Contents. There are 6 different kinds of loot bags, each containing a different kind of loot when dropped from an enemy (though they all make the same sound when dropped). The 6 types are shown below. Each bag has a lifespan of 60 seconds, it will disappear after the 60 seconds. The timer does not reset by adding/removing to/from the bag.
Regular Loot Bag - Looks like a brown potato sack, and is usually about as valuable as one. When dropped by a killed enemy, it tends to hold lower tier items with potions being rather common. It also appears when someone drops a trade-able item. Everybody can see the contents as well as take stuff out or put stuff in. It is the only bag with this capability, and thus is sometimes called a "public bag". As of 10.0, rare pets dropped by dungeon bosses are dropped in these bags.
Purple Loot Bag - Colored dark purple and often holds mid-tier loot. If you drop a non-trade-able item, such as an ambrosia or UT, then it will appear within this bag. Only you can see this bag and its contents (soulbound). Like any bag, if you leave it on the ground for too long, it will disappear along with its contents!
High-tier Loot Bag - It is a light blue bag that sits upright and is sometimes dropped by gods and event bosses. This bag contains the highest tiered items and drake eggs. Again, it is another soulbound bag.
Blue Potion Bag - This bag is dark blue and looks full. Sometimes dropped by gods, this is a pleasant sight to see when you kill an enemy. Different gods drop different kinds of pots. Like all bags other the Loot Bags, which means that sometimes other soulbound items may be dropped along with the potion inside, such as Desolation Armor. Also, Pet Eggs and tinctures are dropped in these bags.
Untiered Loot Bag - White and beautiful, these contain some of the rarest items in the game. At least one has a chance of dropping from each dungeon boss (and some treasure rooms), excluding Dreadstump the Pirate King, Arachna the Spider Queen, Mama Megamoth and the Masked Party God. All of the items in this bag have some of the lowest chances of dropping. The Untiered Loot Bag has priority over all other types of loot bags, except the Boosted Loot Bag.
Boosted Loot Bag - This bag can only be found while under the effects of a Loot Tier Potion, Loot Drop Potion, or items of similar effects. It will take priority over all other bags, from Regular Loot Bags to Untiered Loot Bags, as long as the effects of the Loot Potions boost the contents that would have been within the normal dropped bag.Please refer to the following chart for pictures of what you may see for each type of bag:

Brown Bag

Purple Bag

High-Tier Bag

Blue Potion Bag

Untier Bag/White Bag

Booster Bag
Pets!
As of Release 12.0.0, pets are only obtainable through "pet eggs" which are dropped in dark blue potion bags by Lesser Gods, Gods of the Realm, Event Gods, Dungeon Bosses, and Oryx 1 and 2. In general, players who had purchased pets in previous builds were given a corresponding pet egg. All pets who used to have idle animations were given a stationary look instead. Pets come in different rarity levels, Common, Uncommon, Rare, Legendary and Divine. Each pet can also have up to three abilities depending on their rarity level, and the abilities are improved by feeding pets items.
The page at http://pfiffel.dcom/pets/ is useful for experimenting with the pets, using a close representation to how they are in game.
Pet Yard: The Pet Yard is where eggs must be hatched, and it can contain up to 50 pets. Pets are only removed from the yard upon being Released or Fused- they do not leave when you die. The Pet Yard is also the place to feed or fuse pets, and both functions cost fame or gold, at an increasing price dependent upon the pet's rarity level.
Feeding: Items contain a "Feed Power" shown in their description, with higher numbers meaning that the item will increase a pet's levels more. It is advisable to use higher feed power items when possible, as it costs fame or gold each time a pet is fed. Food items can also be bought in the Nexus, used only for feeding pets.
Fusing: Fusing pets is only possible when the two pets used are of the same family and rarity, and as long as the Pet Yard has been upgraded to a high enough level to allow for it. The pet on the left and its stats will be retained while fusing, while the other will be consumed and disappear from the Pet Yard. It is best to max both pet's first stat before fusing, otherwise it will have a lower stat cap once fused. The level of the abilities other than the first does not matter for level cap, but does give a lower starting level. Fusing will give a random pet of the next rarity level. Below is a breakdown of the respective costs. "Fusion Strength" is a measure of how maxed the two pets being used are.
Guilds
Introduced in build 121, guilds are a feature to help players organize and interact. They cost 1000 fame to make, can hold up to 50 members, and allow 5 different ranks.
Features of a Guild
Members of a guild can be one of five ranks: Founder (represented by a Gold Crown),Leader (Silver Crown), Officer (Flag), Member (Silver Sword), or Initiate (Green Shield). The creator of a guild is automatically made its Founder, and new members start off as Initiates.
More information on changing ranks can be found below under Administrating a Guild. All members of the guild have access to the guild chat and guild hall, described below.
Guild chat is a cross-server messaging system that can only be seen by members of your guild. Messages in the guild chat will appear as green text; to type your own messages into guild chat, type "/guild [message]" or "/g [message]". ( You can just hit the g key and then start typing too).
Guild Fame is accumulated through the deaths of on guild members. The account fame bestowed upon a guild member consequent to the death of a character is translated directly into guild fame. Guild Fame can be spent on guild hall upgrades.
The guild hall can be accessed from the lower part of the nexus, directly left of the vault portal. In the guild hall, there are a few important locations:
To start a guild, simply walk up to the podium located in the top-right courtyard of the Nexus. If you have the required 1000 fame, you will be allowed to create a guild with a unique name (up to 20 characters), and will be automatically appointed its Founder.
Joining a Re-existing Guild
To join a guild, a Founder, Leader, or Officer must invite you. They can do this by either by clicking on your name in the character menu and pressing the Invite button, or by typing "/invite [playername]". Similar to a trade request, the invitation can only be made to players nearby and will show up at the bottom right of your screen; simply click the Accept button, and you're in!
Administrating a Guild
Including the invitation of new members, the guild Founder, Leaders and Officers are responsible for managing the ranks of other members, or kicking out unwanted players. All ranks/privileges are controlled using the podium located at the very top of your guild hall. The Founder can change the rank of anyone else in the guild. Leaders and Officers can change the ranks of members. A Leader may change the rank of anyone except the Founder, including adding new Leaders, but cannot demote co-leaders. Officers can promote and demote Members and Initiates. Furthermore, clicking the X next to a player's name will boot them out of the guild, although they can always be re-invited.
Guild Upgrades
The guild Founder or leaders can also spend guild fame to upgrade the guild hall at the table next to the guild chronicle. Each successive upgrade will increase the size of the guild hall and add additional cosmetic features, such as rugs, weapon racks, tables, etc. The first upgrade costs 10k GF, the second costs 100k GF, and the third costs 250k GF.
Leaving a Guild
There are two ways to lose membership in a guild: either by willingly renouncing membership, or by being removed as described in the Administration section. To leave your guild, approach the podium in the rightmost nexus courtyard and renounce your membership.
Features of a Guild
Members of a guild can be one of five ranks: Founder (represented by a Gold Crown),Leader (Silver Crown), Officer (Flag), Member (Silver Sword), or Initiate (Green Shield). The creator of a guild is automatically made its Founder, and new members start off as Initiates.
More information on changing ranks can be found below under Administrating a Guild. All members of the guild have access to the guild chat and guild hall, described below.
Guild chat is a cross-server messaging system that can only be seen by members of your guild. Messages in the guild chat will appear as green text; to type your own messages into guild chat, type "/guild [message]" or "/g [message]". ( You can just hit the g key and then start typing too).
Guild Fame is accumulated through the deaths of on guild members. The account fame bestowed upon a guild member consequent to the death of a character is translated directly into guild fame. Guild Fame can be spent on guild hall upgrades.
The guild hall can be accessed from the lower part of the nexus, directly left of the vault portal. In the guild hall, there are a few important locations:
- Guild Chronicle: From here, you can view the current members of the guild, and the guild fame they have each contributed. The Founder, Leaders, and Officers can promote, demote, or discharge members of lesser rank.
- Guild Hall Upgrade: This is where the Founder and Leaders can spend guild fame to upgrade the hall.
- Guild Board: This board, which can be edited by the Founder, Leaders,and Officers, contains a large text field which can be viewed by any member.
To start a guild, simply walk up to the podium located in the top-right courtyard of the Nexus. If you have the required 1000 fame, you will be allowed to create a guild with a unique name (up to 20 characters), and will be automatically appointed its Founder.
Joining a Re-existing Guild
To join a guild, a Founder, Leader, or Officer must invite you. They can do this by either by clicking on your name in the character menu and pressing the Invite button, or by typing "/invite [playername]". Similar to a trade request, the invitation can only be made to players nearby and will show up at the bottom right of your screen; simply click the Accept button, and you're in!
Administrating a Guild
Including the invitation of new members, the guild Founder, Leaders and Officers are responsible for managing the ranks of other members, or kicking out unwanted players. All ranks/privileges are controlled using the podium located at the very top of your guild hall. The Founder can change the rank of anyone else in the guild. Leaders and Officers can change the ranks of members. A Leader may change the rank of anyone except the Founder, including adding new Leaders, but cannot demote co-leaders. Officers can promote and demote Members and Initiates. Furthermore, clicking the X next to a player's name will boot them out of the guild, although they can always be re-invited.
Guild Upgrades
The guild Founder or leaders can also spend guild fame to upgrade the guild hall at the table next to the guild chronicle. Each successive upgrade will increase the size of the guild hall and add additional cosmetic features, such as rugs, weapon racks, tables, etc. The first upgrade costs 10k GF, the second costs 100k GF, and the third costs 250k GF.
Leaving a Guild
There are two ways to lose membership in a guild: either by willingly renouncing membership, or by being removed as described in the Administration section. To leave your guild, approach the podium in the rightmost nexus courtyard and renounce your membership.
Fighting Oryx
- The most important thing here is to survive to reach Oryx himself.
- When Oryx announces that he has closed the REALM that is your notice to stop fighting and get as many health pots as possible. You have 2 minutes to do this. If you run the /tutorial you have to be out of the Tutorial before the Realm starts shaking.
- If you are a Noob (nothing wrong with Noobs, we were all one once) or if you are not level 20 or if you want to better your odds of living when in the castle, hang back towards the middle of the group. If you are in front, you are taking the brunt of the attack and attacks can come fast and furious and death follows.
- As you go through the castle be aware of the Brute of Oryx. This guy moves fast, targets the closest player and will chase him down but the scariest is his Armor Break attack. This can be deadly to even maxed characters specially if you are surrounded by the other little greeblies that cast slow and charge you. Kill the Brute from a distance or just avoid him.
- There are still some people that play Priests and even some of them heal people that are hurt without prompting. YOU want to be healed, so it is in your best interest to take the time and remove the Living Floors of Oryx (the eyeball on the floor tile) that cast Quiet. Doing this will help keep the healers active and healing as you move through the castle.
- When you get to the Stone Guardian's chamber (they guard the entrance to Oryx himself) you have to be careful. There are 2 guards, after the first guard is killed you have to take care not to stand in the center of the room or close to it. This is because the remaining Stone Guardian will throw his sword to the center of the room and that sword will paralyze and damage you. This will kill you quick and if there are enemies around you will die even faster. I see people die in the center or the Stone Guardians room all the time. Make it a habit to never walk through or stand in the center of the room until both Guards are dead.
- Sometimes people rush ahead to get to the Stone Guardians. Typically if there are only a few players battling the Stone Guards you can keep your own pace through the castle and still get to Oryx. But, If there are several people battling the Stone Guards and you are not close to that area you will have to pick up the pace to make sure you get to Oryx in time.
- How do you know what is going on? Glad you asked, watch your Mini Map all the time and when you see someone fighting the Guardians and you are still fighting your way through the castle, then hover your mouse over to see what their class of player is.
- Even if you look up and all of sudden you realize that there are no one fighting the Stone guards that just means they are now fighting Oryx. You still have time to get to Oryx and get some good Soul bound damage in. Don't give up and leave.
- Once the Stone Guardian's are dead, make sure that you are going to Oryx Chambers and not a Pirate Cave that some twit opened up. People open these just before Oryx is dead or just before they open the Wine Cellar. They open right on top of the the door to Oryx Chambers or the Wine Cellar so check the door before you enter.
- Fighting Oryx can be made easier when you group everyone together. This means that people that buff and heal are helping everyone. This grouping of people is called "stacking". In most cases when I am present during the times of a group stacking Oryx can be defeated before he goes into his first phase or shortly after the first phase because of the the multiple buffing from Pallys and Warriors.
- When fighting Oryx try to hang close to Warriors and Paladins so that you benefit from their buffs. If you are a healer try to center yourself in the largest group of people

Dungeon Guides
This guide will show tips and tricks for many of the dungeons and events that can show up in RotMG. If you have some tips that you think I should consider or a correction or two please message me.
I should note that I will only add dungeons and events here that drop Stat pots or worthy items. I will not talk about Pirate Cave, Forbidden Jungle, Spider Den and Forest Maze because they are very easy with no drops of interest
I should note that I will only add dungeons and events here that drop Stat pots or worthy items. I will not talk about Pirate Cave, Forbidden Jungle, Spider Den and Forest Maze because they are very easy with no drops of interest
- The Crawling Depths
- The Woodland Labyrinth
- Tomb of the Ancients
- The Rock Dragon
Recently Asked Questions
How do I start killing monsters?
When you play Realm of the Mad God for the first time, you start at the tutorial, which explains you some things like fighting, using your ability and equiping stuff.
When you end the tutorial, you head to Oryx’s Kitchens. Kill all the guards and the boss to go to a Realm.
Where do I get more stuff?
Fighting monsters, loot their bags. The more you advance in the realm, the better stuff you get. Oh! and monsters become more powerful too.
How do I change my class?
You need to unlock some classes to play another. You start with the Wizard, the default class. You need to reach level 5 with all Tier 1 classes to unlock them all. To unlock Tier 2 classes, you need to reach level 20 with all Tier 1 classes. To unlock Tier 3 classes, you need to reach level 20 with all Tier 2 classes.
Who is Oryx the Mad God?
He is the boss of the entire game. He is very powerful! You don’t want to be near him when you’re in his chamber! unless you’re a powerful adventurer.
Is there a way to get Realm Gold without buying it?
No, there isn’t. If you buy Realm Gold, you help developers to keep working on the game.
What is Realm Gold and where do I use it?
Realm Gold is the game money. You start with 50 free Realm Gold, but you can buy more at the Nexus shop, just stay on the big gold coin. You can buy plenty useful stuff like character slots, vaults, backpacks and more!
How do trade stuff?
You can trade stuff with other players. Click on a player name in the player list at the right-corner, then click “Trade”.
Both of you can select any items you want to trade. Think what are you doing, then press “Trade”. The other player needs to accept the trade to make it succesful.
After level 20… what?
Defeat Oryx
Band together with other players to defeat all Quest Bosses, including Skull Shrines, Cube Gods, and Pentaracts and finally Oryx will show up to duke it out. All players on the server will be transported to his lair and he will appear on your mini-map as a red dot in the middle of the map no matter how far away you are. It will take a team to defeat him, as he continually spawns his own demons to shield himself from your attacks.
Collect the best equipment
As you level up, you’ll find plenty of equipment that your class may or may not be able to equip. Find other players via chat to share loot with until you have the best equipment for your character. The maximum level is 20, but equipment is not limited based on player level.
Farm the gods
In addition to dropping good equipment, the gods also drop potions that can permanently increase your stats. Many players have taken to farming the gods for these potions, but you have to be careful… kill off too many and they won’t be able to reproduce!
How do I max my character?
You max it with stat potions. Stat potions are harder to get if you’re not powerful. With a level 20 character, go to “godlands” with a group of adventurers, kill gods and see if they drop stat potions. In the way, you get great equipment. You can have a max of 8/8 Potion Stats on you.
What is fame?
Fame is useful for many things. You can buy Drake Eggs in the Nexus shop. You can use your fame to create a guild, join the Battle Arena or upgrade your guild hall or pet yard.
What are pets?
Pets are helpful creatures that will follow you in your journey. You find pet eggs when you kill a boss. Hatch them in your pet yard! remember you must have your pet yard upgraded if you want to hatch a higher level egg. Feed your pets with equipment or delicious food to increase their ability level. You can fuse your pets to unlock new pet abilities or evolve into a better pet. Remember to reach the maximum pet abilitiy level before fusing, it’ll end up being a bad fusion and will make the level cap worse!
